 |
|
#1
|
|||
|
|||
|
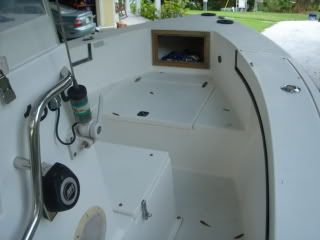
getting ready to put trim around my gunnels. the stuff im getting milled looks like half round with the bottom half cut out. it went around the inside of the gunnel, im wondering how to die it out. anyone know how they looked original? when i got the boat the trim (old and shot) ran along the side and died up flush with the top of the gunnel; like a giant U. if any of you could get a picture up of your original trim i could copy id really appreciate it. or if ive got the right idea just let me know. i got extra milled since it was surprisingly cheap(w/ the price of teak these days). thanks
|
|
#2
|
|||
|
|||
|
Here is a shot of my old 1989 gunnel trim-set back pretty far

__________________
Snookerd |
|
#3
|
|||
|
|||
|
thats exactly what i had in mind. thanks a lot for posting picture to reassure.
|
|
#4
|
|||
|
|||
|
22- I have an 18 (1987 CSY)and it had the same trim that snookered has. I re-did mine with santos mohogany trim and it came out great. I will try to send some pics. I still need to do my anchor locker frame and console frame. I have a friend that builds cabinets to help me with the milling.
|
|
#5
|
|||
|
|||
|
ran trim thurs evening; came out gorgeous. if only all boat modifications'repairs were as easy as that!! so simple and yet it dresses the boat up so much. didnt even break out the chop saw.
|
|
#6
|
|||
|
|||
|
I could use some gunnel trim myself, could you post a couple pics of what you had done.
__________________
Any way you measure it - dumbass is expensive |
|
#7
|
|||
|
|||
|
eggsuckindog, see above for pics, i cant figure that out. very simple to do. heres step by step.
1-get teak "half round" milled down so the bottom half is cut off. you should be left w/ a rounded over piece about 5/8 wide on the bottom. Cost $50 for 36 feet at my lumber yard, not terrible. 2-rub teak oil all over, dry sand repeat dry sand repeat etc 3-cut the small pieces (vertical ones) with 45 degree angles a few inches long. hold in place and mark the top flush cut w/ a pencil. you could use a chop saw but i just used a japanese pull saw and old school miter box for this. if you dont have miter box just hold small speed square and mark the 45 degree. 4-predrill holes (from behind) then flip over and use countersink bit from front side-you dont want the screw to fight through the wood, its too thin, let it grab the fiberglass behind!!! 5-screw verticals in place, repeat above steps to fill long stretches in between. 6-i used #4 1/2 inch flat top screws, any bigger damaged/split the wood; spaced 12-16 inches. 7-after sitting outside over night, trim had expanded here and there, small dab of glue here and there held with a clamp fixed that right up. 8- i ordered too much on purpose as i thought i may screw up, for an 18 ft boat 25 feet would have been plenty. i can mail you a scrap if you want to have something to take to get milled. you probably dont want to make it yourself; i have a ton of wood working/shaping tools but its just so small and fragile and i like having all my fingers!! if any of this doesnt make sense ask me, also i could email you some pictures, i already have some loaded on my computer that i sent to my father... |
 |
| Thread Tools | Search this Thread |
| Display Modes | |
|
|