
|
|
#11
 01-24-2021, 11:03 AM
|
|||
|
|||
|
Quote:
keep in mind however you decide to do it that your outboard mounting bracket needs to fit over the clamping board with some room to spare should you need to lower the engine which would be highly unlikely...does this make sense? strick
__________________
"I always wanted to piss in the Rhine" (General George Patton upon entering Germany) 
|
|
#12
01-24-2021, 11:05 AM
|
|||
|
|||
|
When you cap the bracket with the swim platform mold you'll have the 4 layers (you already laminated) + "mud" + the thickness of the swim platform cap (another 5 - 6 layers of 1708). That make 9 or 10 layers of glass. Does that address your question?
|
|
#13
01-24-2021, 11:14 AM
|
|||
|
|||
|
Another note . . . See the front lip on the Hermco bracket.
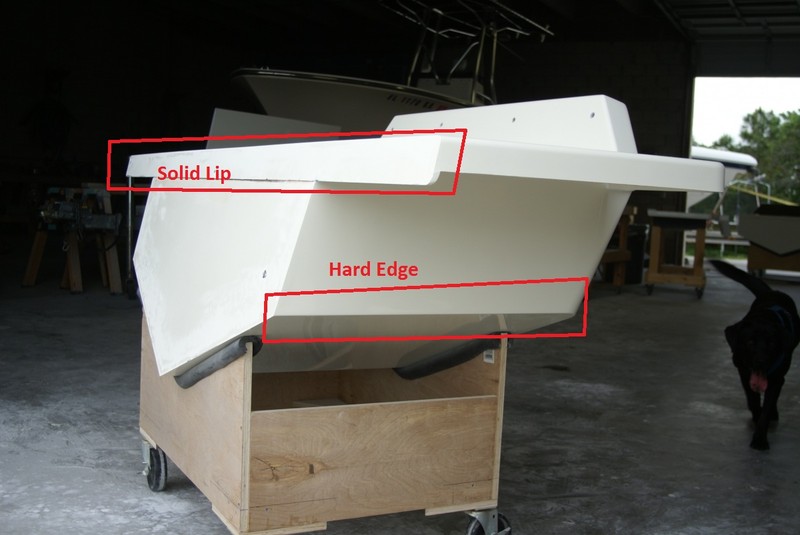 This was a trick Hermco used with his caps to stiffen up the swim platform area. We didn't learn this until much later on. Please ignore the "hard edge" label . . . that was label for another bracket conversation.
|
|
#14
01-24-2021, 11:15 AM
|
|||
|
|||
|
Yes, the transom of the bracket. After I test mount it to the boat and feel good about my height and such, I plan on trimming the board to the blue lines, give or take. Of course that means that there will be no glass on the edges. I can obviously seal with neat epoxy. I guess I was not realizing that the "hood" on the platform was structural. I figured it was just to minimize fairing, being that it was just puttied to the front of the clamping board.
|
|
#15
01-24-2021, 11:28 AM
|
|||
|
|||
|
Quote:
 we had many pictures and even some diagrams of the Seamark brackets but it still did not answer all our questions as we could not see it from every angle as to how they were built.. I found this picture of the first one I built...all epoxy...over kill to say the least but I ended up hanging a Brand new Suzuki 250 on that boat after the Yamaha kept giving me trouble. strick
__________________
"I always wanted to piss in the Rhine" (General George Patton upon entering Germany)
|
|
#16
01-24-2021, 11:29 AM
|
|||
|
|||
|
Reading this again . . . The sides of my transom core were beveled and glassed only top of the core was exposed until it was mudded/capped with the swim platform mold. The seem edges were sealed and glassed on my last bracket.
 
|
|
#17
01-24-2021, 11:31 AM
|
|||
|
|||
|
Quote:
|
|
#18
01-24-2021, 11:59 AM
|
|||
|
|||
|
"Potter puttied his decks and top caps to his transoms in much the same way... trying to free the two joined parts has annoyed many a seacraft restorer.."
Some of that is my concern. On mine when I tried to remove the in floor live well it was potter puttied to the hull. One good pull with a pry bar and the whole thing just popped right off. A couple other places there was putty a chisel under an exposed edge and the whole pool of putty just came off intact. Now granted it was poly based putty and I am using epoxy but... Anyway I'm going to do a little more head scratching and see if I can come up with a plan. I don't want to reinvent the wheel but I am willing try something different if it has merit.
|
|
#19
01-24-2021, 12:46 PM
|
|||
|
|||
|
Hermco ground and glassed this seam.
 
|
|
#20
01-24-2021, 01:33 PM
|
|||
|
|||
|
Ok thanks guys I understand.
Really appreciate all the information and pictures you both posted! I will make sure I post pictures of what I do. Once I get the tub mounted and double check all my height measurements Ill cut the transom to the right height and then start on the platform mold.
|
 |
|
|


 Linear Mode

