
|
|
#21
 07-29-2007, 09:22 AM
|
|||
|
|||
|
Thanks for the info. I was planning on tying the liner and stringers together. The liner has "sagged" down some, and has caused stress cracks in several places. I was thinking of putting some cross bracing in front and behind the tank running between the stringers. Have you ever seen/done that?
I spent a couple hours on the gas tank yesterday, and it is wedged in there pretty tight. The foam is compressed tight. I am going to put some long 2x4s underneath it, with threaded rod going through a cross brace and use the threaded rod to apply preasure. I think steady presure on it will release it out. Once I get it moving out, I will cut what I have to to remove it. 
|
|
#23
07-29-2007, 09:18 PM
|
|||
|
|||
|
Just a suggestion.
Get a hand cross cut saw and cut the foam. You could do two cuts per tank side and then dig out the center section, thus giving yourself some working room. Make sure the tank is drained as much as possible, remove the sending unit, thus leaving a sizable opening into the tank. To be really safe, shoot a CO2 fire extinguisher into the opening forcing out an normal air with oxygen in it and fashion a piece of pipe with duct tape wrapped on the ends to prevent any metal to metal sparks. Attach the pipe to a "come along" or other lifting/ pulling setup and pull the tank clear slowly. This was described elsewhere on this site, so do a search. It loooked doable and reasonable to me if one were to think it through. For the re-install, look up David Pascoe's article on how to install an aluminum fuel tank. http://www.yachtsurvey.com/fueltank.htm JMHO! Good luck!!!!! (and be careful- gas fumes are highly explosive!!!)
__________________
Getting home is more important than getting there! Plan accordingly!
|
|
#25
07-30-2007, 09:20 PM
|
|||
|
|||
|
I have a carbide tip chain saw we use for disaster relief. It cuts wood, fiberglass, and aluminium like butter. I think I will leave it on the shelf for this one.
I tried a new approach, and the tank is freee and pretty well out, got rained on, and needed a second set of hands to catch it this afternoon. I should have it out in the AM. I used a 6' piece of 4x4, a 3' piec of 5/8"s threaded rod, and a 5' 2x4 and it took about 2 hours to get it out. I drilled a hole in the end of the 2x4 and slide it under the tank lengthwise. I drilled another hole in the center of the 4x4, and placed on top of the stringers just past the end of the gas tank. I slide the threaded rod through the 4x4, and down through the 2x4 that was under the gas tank. Then I put a big washer and a nut on the bottom end, underneath the 2x4. I put another washer and nut on top of the threaded rod, on top of the 4x4. Put the wrench on it, and in about 15 minutes, I had it popped free, and started sliding it toward the back of the boat. The steady presure broke it loose from the foam. I currently have the rear of the tank resting against the transom, and I will have to grind a little off the tabs to get it out. No comes the 900 dollar question, do I replace the gas tank? It wasn't leaking. I will clean it off tomorrow, and see how bad it is.
|
|
#26
08-01-2007, 10:39 PM
|
|||
|
|||
|
The SeaCraft soap opera continues.
The tank is out, and it looks like she is getting a new one.  Would you say this was pitted? 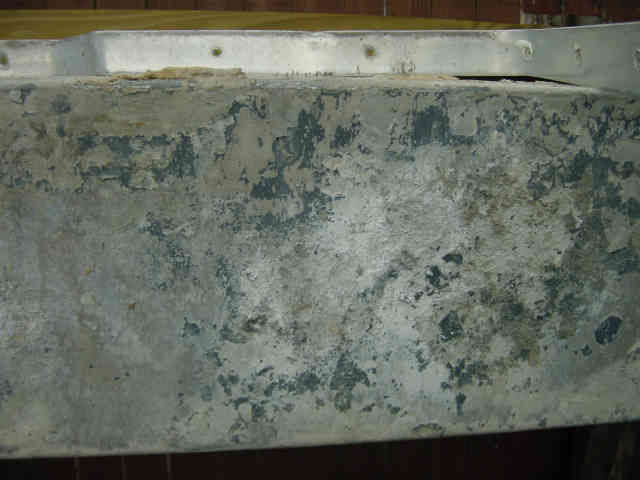 Now for some more fun. I suspected that a stringer was loose. I didn't suspect it was loose 1/2 the length of the boat. It seems that the port side is always the screwed up side on a seacraft. They didn't put enough glass to hold it and they didn't rough it up when they put it in there. It just pulled apart, with shiny glass underneath. The other side looks fine, and has more glass over there. I am probably going to re-enforce it. Good news is the stringers are dry and appear to be fine. 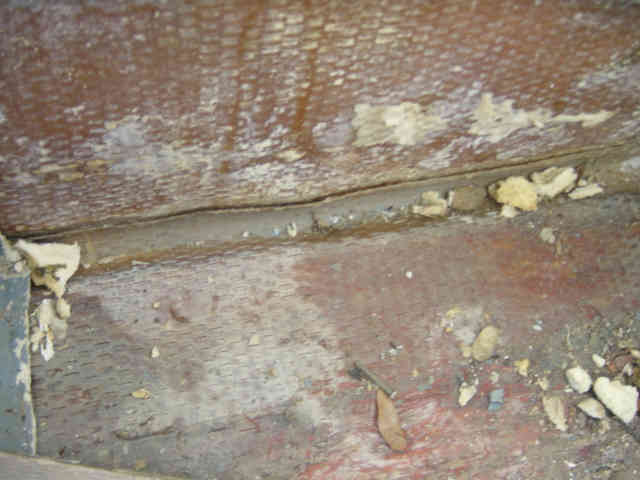 Here are some shots of the empty spaces. One of these shows the "tool" in action. One guy, 4 hours, and the tank is out. No trying to get the foam out, it lifted straight out, even though it was twisted/shifted in there. Here is the tool I came up with. 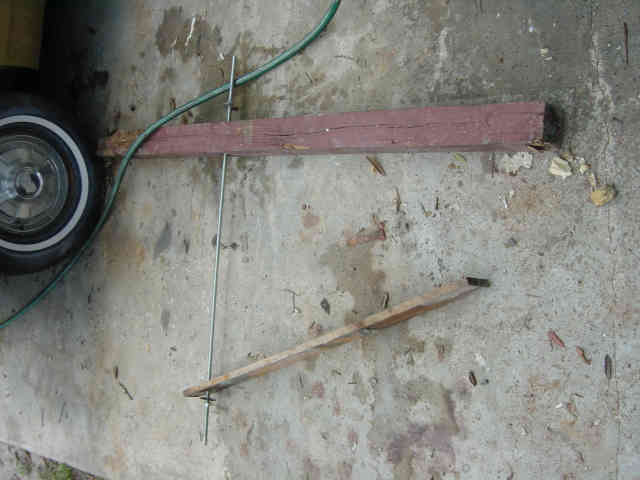 Well, I am going to take 5 days off, and heal, regroup. That new tank is going to leave a dent in the wallet, but I don't want to do this twice.
|
|
#28
08-03-2007, 05:02 PM
|
|||
|
|||
|
John B or Will, I tooked the transom out. Now I', sanding the inner fiber glass of scepter 20'. I cut my marine wood using the back of the boat as a pattern.
Question? . The wood has to be toching the side of the boat? Or how close should be? Please any body call me @ 904-318-6084. Thank you
|
|
#29
08-07-2007, 08:21 PM
|
|||
|
|||
|
Tiburon,
Most of the original transoms I have seen are within 1/2 - 1 inch of the corners. On mine, I am probably going to put 2 layers or reenforcing glass in the corners, so I will probably come out about 2 inches from the corners, then put the coring material in, and come back with 3 layers of glass on top of the coring, and into the corners. With there being a bracket on my boat, and a plate/beam on the inside, the corners are going to load up, so I am going to hit them hard, and also put in knee braces to the floor, and kick braces to the side (if I can fit them in). If anyone knows a better plan, let me know.
|
|
#30
08-10-2007, 01:01 AM
|
|||
|
|||
|
JohnB,
have you decided on your bracket, are you installing a single or a twin bracket fiberglass or aluminum.if you are un decided i can email you some pictures of the single and the double bracket that gause built sells i have the twin bracket on mine and i will put the single bracket on my 20 sceptre when i put it together for my daughter this winter
__________________
1979 23 SCEPTRE TWIN 150 Opti's/GAUSE BUILT BRACKET
|
 |
|
|


 Linear Mode

